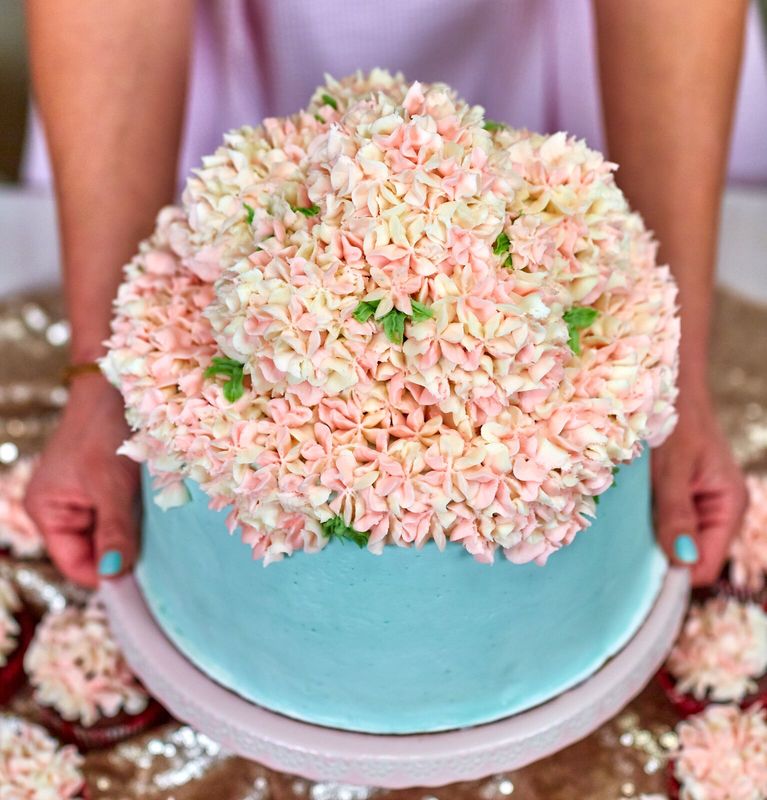
 Photo by To The Fourth Studios 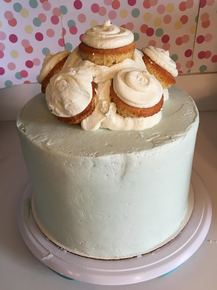 Hey guys! So I had seen this style of decorating cupcakes floating around Pinterest, and I had that thought we all have scrolling through Pinterest: "I should do that sometime...". You know, and then you never actually do? Eventually a special birthday rolled around, the idea of a hydrangea cake was thrown out there, and it was the perfect opportunity to try it out. Now, Sugar Hero had posted a video tutorial of little hydrangea cakes; which was adorable in a little cake, but I thought the hydrangea technique would look a little odd all over a large cake. So, I decided on a hydrangea topper. I typed that into Pinterest only to find it had never been done in the style I was thinking! (How often does that happen?) Therefore, the purpose of this blog post: how to make my hydrangea topped layer cake! I started out with 4 layers of vanilla bean cake, layered with vanilla bean buttercream that made up the crumb coat and light blue buttercream you can see in the picture above. So being the novice blogger I am, it slipped my mind to take pictures of the process of sticking the cupcakes on the top of the cake that make up the base of our hydrangeas, so now I'm going to try my very best to use words to make this process as clear as possible! First, I stuck one cupcake in the middle of the top of the cake, and secured it by sticking a cake pop stick through the cupcake and into the cake. (Leave a little of the stick sticking out of the top, because the middle cupcake will have another cupcake on top.) Then I positioned cupcakes on their sides around the center cupcakes, similarly securing them with the cake pop sticks and buttercream! Finally I stuck the final cupcake on the top of the center one, pipe some buttercream around to round out some of the edges, and ta-da! We have the base for our flowers! So next, we have the process of getting the different colors of buttercream into the bag so we can pipe our pretty little flowers. Now they sell fancy divided bags, and I've seen several techniques on how to get your colors into your piping bag so they come out all pretty and multi-colored. However, the best way that I've found is to put your colors (in this case 3) into separate piping bags, then pipe them into your bag with the tip to pipe your flowers (use a closed star tip to achieve the flowery look). So lay your bag down, and one by one pipe your colors in until you have stripes of each in your bag. Now you're good to go! Just start making little blobs of frosting on your cupcake mounds, and it will eventually start to look like a hydrangea. (Don't worry, for a little while you'll be thinking you're messing it up, but I pinky promise it'll come together in the end!) *(Process shown in the slideshow below) I went ahead and continued the flowers over the rest of the top of the cake, and spilling over the sides for an extra little somethin'-somethin', but that's all up to your artistic eye! Similarly I added a few leaves, but they're not completely necessary! Listen to your heart, follow your dreams. The finished product can be seen above, and a little bit of the process is down below in the slideshow! If you have any questions please leave them down below in the comment section, along with any other comments or requests for future posts! Happy Baking! Emily B
1 Comment
7/1/2018 01:41:50 am
Wow that is the most wonderful and delicious looking cake that I have seen for the first time. I was wondering to get the same cake for my birthday and it sure is going to be a good thing to eat. Leave a Reply. |